Install Office 365 Offline with Office Deployment Tool
Some considerations why some people prefer offline installation of applications or without an internet connection are bandwidth savings, so they only need to download it once.
In this article, I am using the Microsoft 365 E3 License. The installation process does not require an internet connection; an internet connection is needed for the activation process of Microsoft Office 365. Based on official references from Microsoft for O365 users with Microsoft 365 for business and Microsoft 365 for home licenses, you can install Office 365 offline using the following method:
Step 1 – Download and install the Office Deployment Tool program
- Create an ODT folder, in this example I will create the ODT folder on Drive
C:. Example:C:\ODT - Download the Office Deployment Tool from the Microsoft Download Center and save it in the folder of your choice, for example,
Download - Double-click the downloaded file, for example, my downloaded file is named
officedeploymenttool_15427-20220.exe - If prompted with the question
"Do you want to allow this app to make changes to your device?", clickYes. - Accept the Microsoft Software License Terms, and click
Continue - In the Folder dialog, browse to the ODT folder you created and click OK. In this example, I am using Path
C:\ODT
Step 2: Download and install Office
-
Install the 64-bit version of Microsoft 365 Apps for business.
-
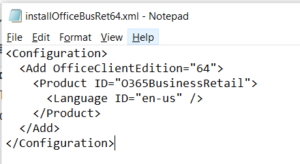
Open the Notepad and fill it with the value below:
<Configuration> <Add OfficeClientEdition="64"> <Product ID="O365BusinessRetail"> <Language ID="en-us" /> </Product> </Add> </Configuration>
Example:
The value of that field may vary depending on which O365 license you are using. The details can be checked from the following link: https://support.microsoft.com/en-us/office/use-the-office-offline-installer-f0a85fe7-118f-41cb-a791-d59cef96ad1c -
Save the file with the name installOfficeBusRet64.xml in the ODT folder.
-
Click on Windows Start, type run, and click Run.

Another option is through the shortcut key:Ctrl + r
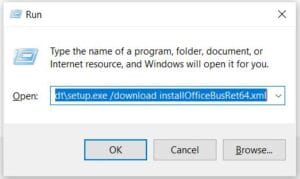
In the Run Console, use the following command:
c:\odt\setup.exe /download installOfficeBusRet64.xml
Then click OK
-
The download process will begin, with the following Windows appearing:

-
If the download window above has closed, it means the download process is complete. Then, check the C:\ODT folder again, where you will find files with a total size of approximately 3.08 GB in the C:\ODT folder.
The capture below shows some files resulting from the download of Office 365 Offline.
- To install O365 Offline, you can do it as follows:
Click on Windows Start, type run and click Run or use the shortcutCtrl + r
In the Run Console, enter the following command:
c:\odt\setup.exe /configure installOfficeBusRet64.xml
Then click OK

- The O365 Offline Installation process will begin shortly

The Installation process is underway

The installation process is complete.

Step 3 – Activating O365 License
At this stage, you need to activate O365 so that your Office Apps (Ms Word, Ms Excel, and Ms Powerpoint) can be active. This process requires an internet connection to log in to your O365 Account.
Here are the steps:
- Open Ms Word on your Desktop, in the image beside, it shows that the O365 License is not yet active.
- Click Account

- Click Sign In
- Enter your O365 email and Click Next

- Once a popup appears indicating that your license is active, close Ms. Word and restart Ms. Word