Port Forwarding SSH Tunnel on Bitvise

If you want to access a MySQL database or any database from Client to Server, and the access is to be done directly over the Internet. I recommend reconsidering due to the following considerations:
- The default MySQL connection is
–ssl-mode=PREFFERED, meaning if the client attempts a connection with encryption and fails, the client will try with non-encryption. -
The Public IP on the Client side often changes, making it difficult for a direct connection to the MySQL database server to remain stable. Therefore, every time there is a change in the Public IP on the Client side, the IP must be allowed from the MySQL database and Firewall side.
-
Opening the default MySQL TCP/3306 port is highly discouraged as it becomes a target for attacks such as brute force attacks and Layer 7 DDoS attacks. Opening the default MySQL TCP/3306 port is highly discouraged because it becomes a target for both brute force attacks and Layer 7 DDoS attacks.
The option for handling this issue is use tunneling, which is done through the SSH service, so the connection to the database server is encrypted and you get reliability in the database connection.
Some tutorials on the Internet explain how to configure tunneling using Putty SSH Client, but in this case, Putty SSH Client has a issue, which is that it cannot auto-connect when the SSH connection lost, unlike Bitvise SSH Client, which has an auto-connect feature.
Bitvise SSH Client can be downloaded from its official link https://www.bitvise.com/ssh-client-download, then please configure the SSH client.
In this case, I will connect to the MySQL database through SSH Tunneling, which means I don't need to open the MySQL TCP/3306 port.
Here are the steps on Bitvise SSH Client
-
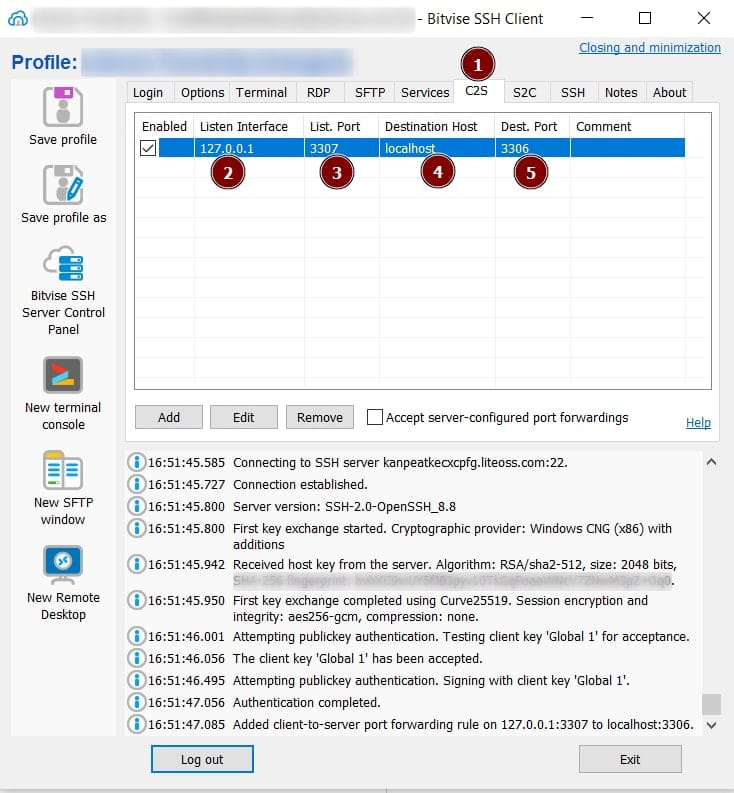
Open Bitvise SSH Client and configure SSH. Open the C2S Tab.
-
Fill in the Listen Interface with
127.0.0.1 -
The Listen Port is the port that will be listened to on the Client side, so the service will listen as a MySQL service. In this example, I filled it with TCP/3307. The Listen Port is not the MySQL Port on the MySQL Database.
-
The Destination Host is the target host (client) where we fill it with localhost
-
The Destination Port is the port that listens on the Server. By default, MySQL/MariaDB will listen on TCP/3306.
-
Click Apply and then Reconnect the SSH Client
-
After the configuration process is complete, a test can be conducted to see if Port TCP/3307 is listening on the Client side. Here’s how:
Open Windows Powershell >Run as Administrator
Run the following command in PowerShell:
NETSTAT.EXE -a | FindStr 3307

-
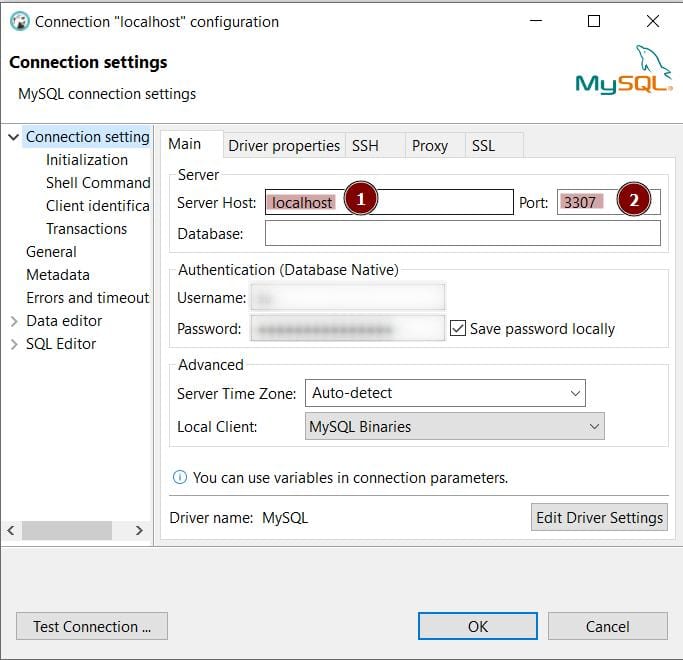
After step 2, the port 3307 is seen listening with Bitvise Port Forwarding. Log in with MySQL Client using the hostname localhost. In the following example, I am using the DBeaver OpenSource Database client, which you can download at the following link: https://dbeaver.io/download/
-
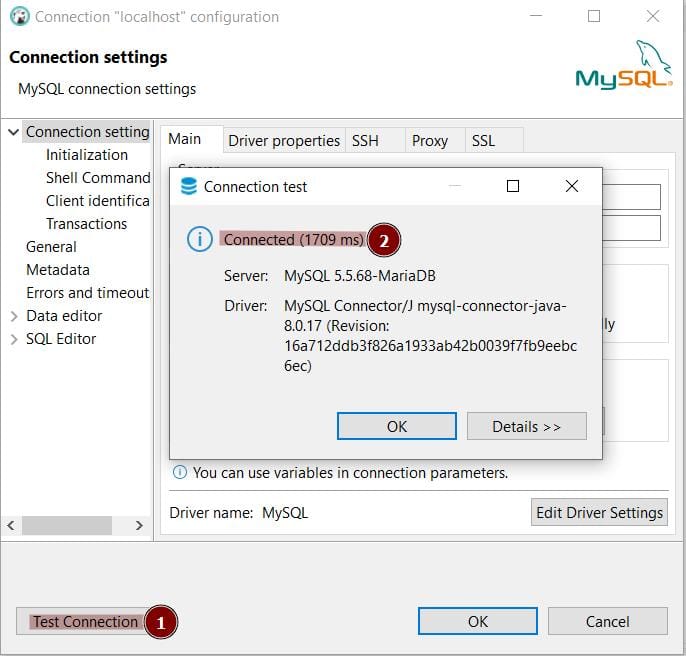
It appears that my test connection was successful, meaning I can log in to the MySQL Server through an SSH Tunnel using the Bitvise SSH Client with the Client to Server connection method.
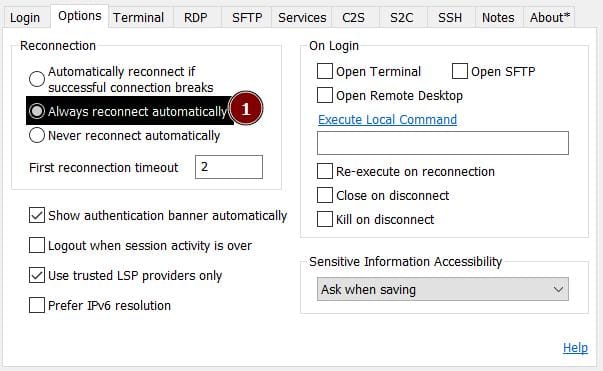
Additional note:
To ensure the Bitvise SSH auto reconnect process runs smoothly, make sure the following configuration: